
After two years, I finally decided to tackle the IKEA LACK shelf. Well, I was thoroughly justified in putting off installing this shelf for so long.
I went to my local small hardware store, Pleasant's hardware. It is a chain but much smaller than Home Depot or Lowe's. The people who work there actually know what they're doing when it comes to DIY. I described to them what I was doing and they recommended the right screws and anchors for the project.
Difficulties:Had to find the placement of studs in my wall
Had to buy a stud finder to do this
IKEA does not provide the hardware or even suggest what type you need for this item. (That is why this shelf is notorious for faulty installation and stability failure.)
I found I had metal studs instead of wood ones, which changed what type of anchor I needed.
No. of trips to a store in one month for this project:
I have receipts from 4 trips, but then there were the fruitless scouting missions here and here.
The trips were to buy these following items:
Black & Decker BullsEye level and stud finder
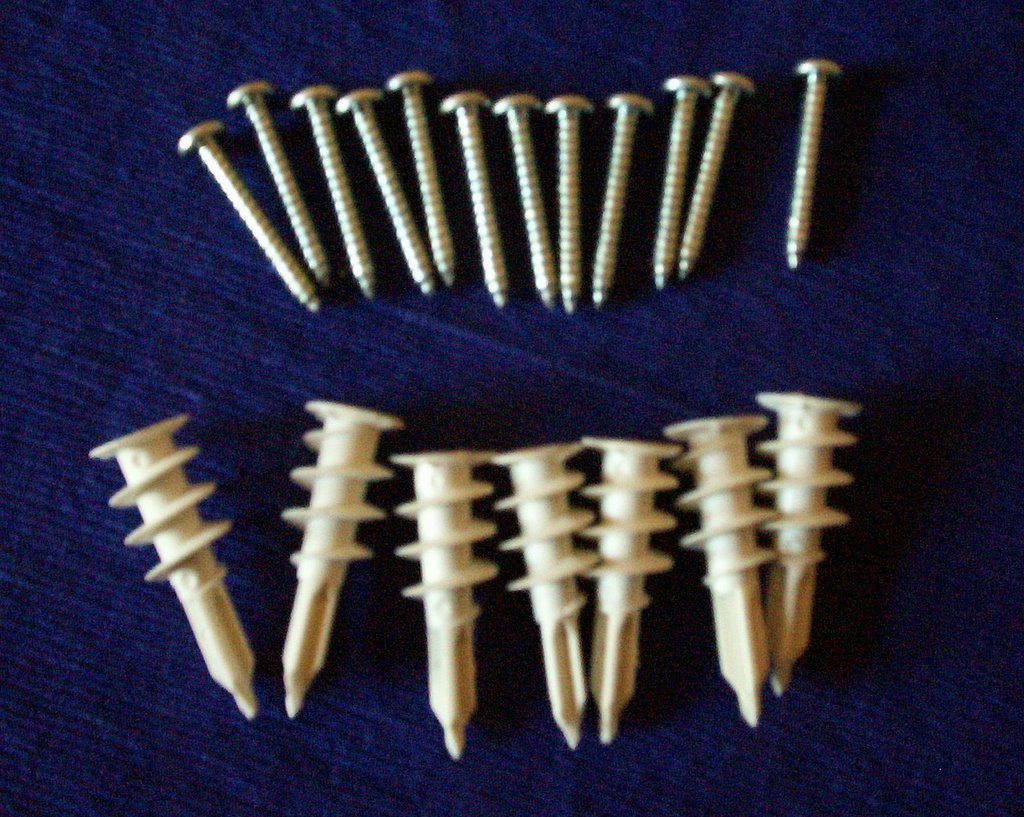
Nylon self-drilling anchors for drywall also known as wallboard (see picture at top of post)
No. 8 sheet-metal screws
Black & Decker 6V PivotPlus rechargeable screwdriver/drill
3/8-inch drill bit (came with the PivotPlus)
Total price of purchases: $70
What I learned:
- Small hardware stores beat the Big Box stores (Lowe's, Home Depot)
- Target has some of the same tools for less money (Black & Decker, McCullouch, etc.)
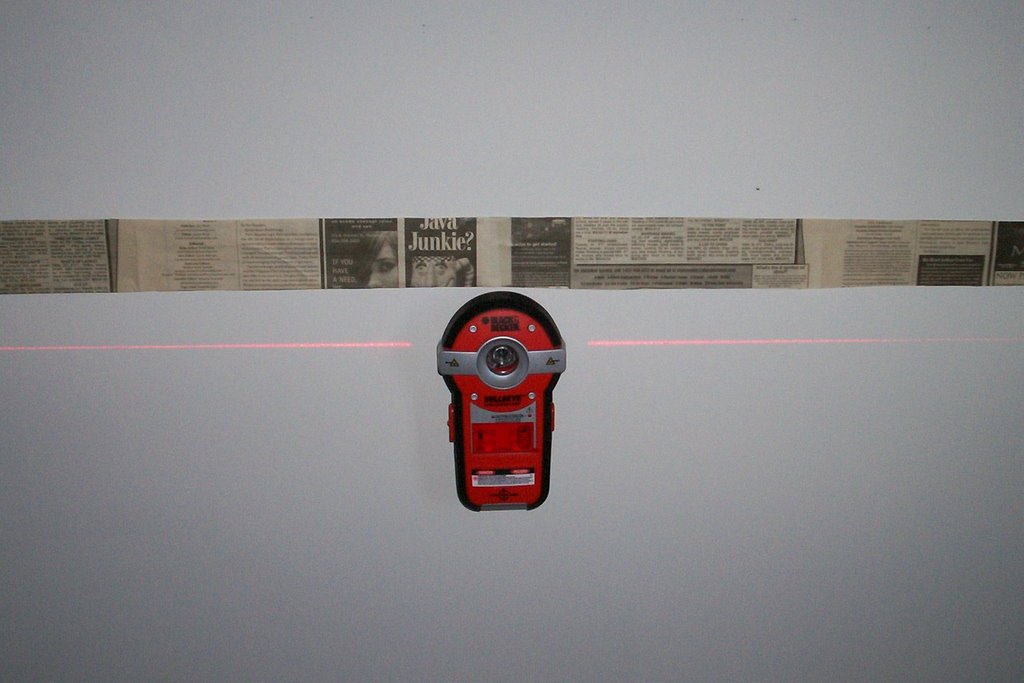
In the mean time, I made a paper cutout the size of the shelf (43.25 X 10.25) and taped it to the wall to try out placement. I had to change where I wanted the shelf so that I could have one side of the shelf attached to a wall stud. One of the things IKEA did make clear on their packaging was that the LACK shelves need to be installed into at least one stud to be stable; two sides if you are lucky.
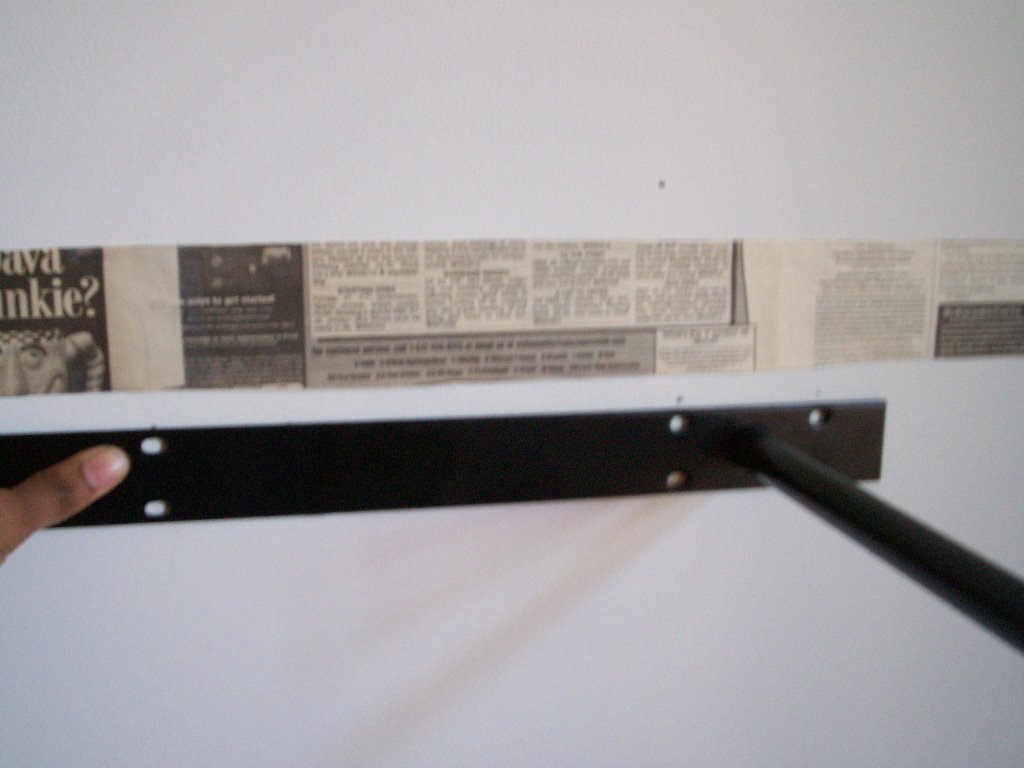
I was now ready to attach the back plate to the wall. The LACK shelf is actually a shell that is slid over this plate and two small screws attach the shelf to the back plate.
The anchors would be used on the side not attached to a stud. They were very easy to install. I inserted the Phillips Head bit on my screwdriver into the hole of the anchor and pressed the point into the wall. Then I just had to twist the anchor into the drywall until it was flush with the wall.
 I placed the back plate up and inserted the screw into the anchor and drove it in until it felt secure.
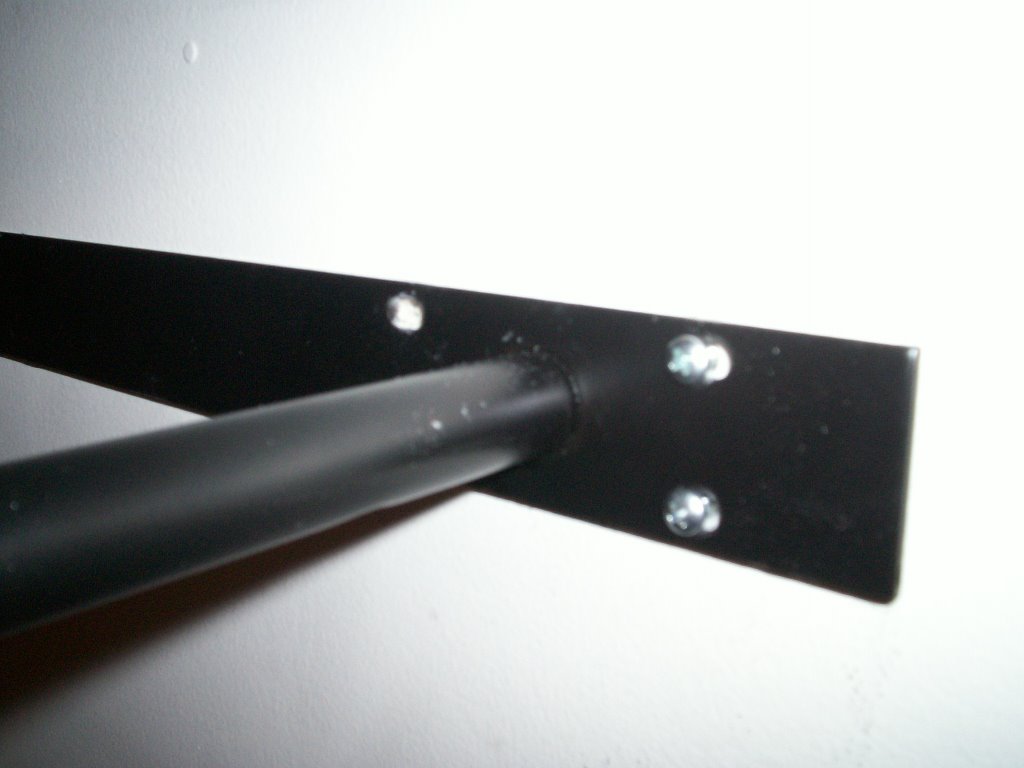
The side of the shelf attached to a wall stud does not need anchors. Because my studs were metal not wood, I had to go back to Pleasant's to buy metal screws that work with wood and metal. I drilled a pilot hole with the drill bit and then twisted the screw into the wall.
After the back plate was completely installed I slid on the shelf, attached it to the back plate with the two small screws that IKEA did supply for this purpose. Voila! It was finally done.
The funny thing is I always loved the way these looked.
Well, I am over it now.


55 comments:
Interesting you should write about this. I wrote into Apartment Therapy about the Expedit (the bigger form of the Lack) to see what people thought. EVERYONE said be prepared to get extra equipment, you need a bottle of wine while doing it, 2 people need to do it. After all the hassle, I asked my handyman and he built me a 6 ft long, 5 ft high replica with 3 coats of glossy white paint for $325. I felt after I got the equipment (plus I had to pay shipping) it was about the same. They look so good, though - you'll be happy with it!
wow wow wow...thanks so much for giving your experience with this. I also love the way they look but if I had to do that much work to get one up, I'd be scared to put anything on it!
When we installed a Lack shelf above our apartment fireplace, we found it was a huge pain as well. It was due to the fact that the pilot holes from the interior structure failed to match up with the studs. We had to buy some heavy duty anchors, but after that, it worked fine.
Now that we've moved, it's sitting in our closet - anyone want it? Didn't think so...
It's not rocket science, really. You just need to drill NEW holes in the bracket that correspond to the stud spacing in YOUR wall. This will be easily accomplished with that snazzy new drill you had to buy :)
Really, though. Speaking from experience, if you attach that bracket into studs across its entire length you'll be able to put a whole library's worth of books on that shelf, worry-free.
Plus, aren't you glad it only cost fifteen bucks instead of the $100+ that West Elm sells them for?
My handy SO has installed a bunch of these for me without problem, but after reading splatgirl's comment, I think he has drilled new holes to accommodate the stud spacing in our house.
of course IKEA does not supply the hardware to attach it to the wall for precisely the reason you describe...everyones' walls are different-plaster, drywall, tile, brick, wood panel--all require different screws/anchors, even studs vary, so you need to figure out what is best for your situation...be glad that IKEA has left that up to you.
Drilling new holes in the armature is a great innovation!
I think you are unfairly blaming the Lack shelf. The issues you bring up are common to any project in which you have to install a load bearing shelf or cabinet. It isn't IKEA's fault that you didn't know what type of stud you had, and didn't own a level. The good new is, now that you own the right tools and know more about your house's structure, future projects won't be so hard.
I love the Lack shelves - we have a few of them around the house. The problem is that the holes are drilled to fit European stud spacing, and not North American. I understand this is also a problem with Ikea's kitchen cabinetry.
Drilling new holes is the best and easiest solution.
Here's a tip which you might find useful. If you run a bead of Phenoseal around the entire Lack shelf to the wall it will become really secure once the Phenoseal dries.
I dont know why i didnt think of drilling my own holes in the backing! I have a big shelf in the entryway it is the biggest pain. what i would do, (because mine would droop) would be to place a washer BEHIND the metal support backing and the hole in the wall. This would kind of push it up a little and when i stacked my books or vases on it, it would push it down to lay straight. agh! but now im going to go drill my own holes so i wont have this problem anymore. thank you!
Instead of drilling new holes in the metal bracket, we installed a sanded/painted 2x4 on the wall--into the studs--and then screwed the Lack bracket to that. It frames the shelf on the wall nicely and is very secure.
We have a bunch of LACK shelves all over the house, and my fiancee also uses them in her office.
A couple of things: American construction uses studs spaced "16 inches on center" - this means that the studs are 16 inches apart, measuring from the center of one to the center of the next. I'm not sure what the European standard is, but you can be sure it's in centimetres, not inches! This is why you're extremely unlikely to line up more than one hole. Many companies make separate versions of their products for the US and for everybody else in the world ... but not Ikea. Oh well.
The other thing: I wouldn't trust those drywall anchors you show in your picture. Drywall is made of plaster-of-Paris between two sheets of paper; if the paper gets torn, or the plaster gets broken or crushed, the drywall loses all of its strength and basically turns into dust. You are depending on a ring of crushed plaster (around the outside of each of your anchors) to hold up LACK plus any books you put on it. If (when!) it falls down, don't be surprised, and don't blame Ikea.
What you want are "molly" or "toggle" bolts, or an equivalent. They spread the load across a much larger surface on the inside of the wall; also, the surface they bear on is unbroken, so it's much stronger. They are very nearly as strong as screwing into a stud. Their only downside is that (with a few exceptions) they are not re-usable - if you unscrew them, the toggle falls down inside the wall.
First, find your stud, and determine exactly where you want LACK. Measure twice, drill once, as they say! Mark the locations of all your holes. Drill the holes - a small pilot hole to get your stud screw started, and much larger holes for the toggle bolts. (I'm writing for people who haven't put it up yet, but if you wanted to upgrade your installation, you could just unscrew your anchors - the holes they leave behind should be big enough for the toggles. You'll also see what I mean about crushed plaster...)
Put the bolts through the holes in your back plate, then screw the toggles just onto the ends of the bolts. The wings of the toggles fold down next to the body of the bolt. If your assembly looks like a capital Y, you've put the toggles on backward.
Now here's the part where a second person comes in very handy: you need to put all of the toggles through all of the holes at the same time. Have your friend hold the back plate in place as you secure the bolts. As you push the bolt into the wall, you should hear a little 'click' as the wings of the toggle pop out of the far side of the hole. If there's insulation inside the wall, you may need to wiggle the bolt around to get the wings free. Once the wings have popped out, you can tighten the bolts - they'll pull the wings toward you, pulling against the inside surface of the wall. Leave the stud bolt (or screw) until last. Of course, make sure everything is level before you tighten things past finger-tight.
If you use good toggle bolts, and seat and tighten them properly, you can practically do chin-ups on you shelf. Katya has 40 or 50 pounds of books and papers on these things and they don't even sag. One note of caution: I guarantee that you will drop at least one toggle inside the wall as you're doing this. Just plan ahead and buy extras, and don't sweat the small stuff. $10 will get you a box of 20 bolts and toggles (at Home Despot - don't know about elsewhere), so just take a deep breath and do it again. You won't be sorry.
I'd second the comment about toggle bolts. I have several of these shelves up, all with toggle bolts. Unless you are putting extremely light objects onto this shelf, I doubt those will hold long.
I wish I weren't so easily turned on by instant gratification and I, too, might have had the sense to drill new holes in the mounting brackets...instead of new holes all over the walls first, and then, finally, the shelves themselves to accomodate the ugly brackets I had to buy at Home Depot in order to mount them to the wall without drooping. No washers for me!
My Lack shelves are installed with four screws into drywall and four molly bolts. It isn't going anywhere. Only hangup was breaking the metal drill bit while trying to drill the two extra holes in the metal bracket. Nice people at Home Depot found me a Cobalt drill bit. Much better than the steel ones that came with my drill. On the whole, putting holes in the braket is pretty easy.
I put my IKEA Lack shelves (got 3of them) up in a couple of minutes. A lot of walls here in sweden (at least in apartments) is
made up of light-concrete, so using some type of expander-bolt or screwplugg http://www.skyltshop.se/objekt144.jpg
usually gets the LACK really secured to the wall.
My BoConcept shelves Occa( LACK alternatives) were much trickier to get up. No big bracket, but several small onces so lining that one up to be 100% level was a little tricky, but the LACK's feel sheep in comparison to the finish/quality of the BoConcept ones..
i am in the process of putting up the LACK shelves. Put 4 up already and 2 more longs ones to go. I cant believe i didnt think of drilling new holes in the bracket to match the stud locations. Has anyone done this post-install (aka. while the bracket is on the wall)? I would prefer not to take these things down again. But i want to be able to put alot of books on these things.
Another comment regarding North American stud spacing, at 16" apart. (on centre)
The holes at the end of each bracket are 48" apart. That means you can drill into two studs without modifying the steel bracket. Match that with a couple of good anchors in the middle of the bracket, and you should have a very sturdy shelf.
My husband and his dad cut down a 3/4" piece of pine, to match the footprint of the shelf on the wall. This was done on a table saw. We anchored this strip of wood to the studs, painted to match the walls (could be painted to match shelf also), and installed the shelf on this. This allowed for the most flexibility of where to intall the shelf and we were able to hit one more stud than we could of if we had drilled the mounting hardwarde itself. We live in California it has gone through a couple small earthquakes with no problems, with at least 40 pounds on them!
European stud spacing? Most European houses don't *have* studs - the walls are concrete or brick, not wood. Scandinavians build wooden houses, yes, but those then generally don't have drywall inside... I suppose it's just something IKEA didn't think about.
I try everything stud finder laser dots all over and after I was happy that it was on the wall till 3 months later everything came thumbling down breaking Throphy's and awards my son had gotten..Good Luck.. everyone..
Yeah, the LACK is only supposed to hold 10-12 pounds of stuff, even in studs. I'm pretty amazed it held more than one trophy for 3 months, those things are heavy.
LACK Shelf (110cm Wide Version) is not designed for Canadian Home. :(
None of the holes on the metal bracket are aligned with studs that are 16" apart like most house.
One may have to modify his/hers with extra holes to be able to secure to more than one stud.
Although I agree with the fundamental point that Ikea sucks, I have to say I am none the wiser about how to put up a floating shelf. What are these studs everyone is talking about?! Aaaargh. I'm sure DIY needn't be this impossible - I have a degree from Oxford and I have no idea where to begin... if I can't even understand this supposed idiot's guide, then what chance have I? I am DIY-dyslexic.
a step up from your standard "winged" toggle bolts are snap toggles... although they require a slightly larger hole they are reusable since the toggle is held in place and doesn't fall into the wall when the bolt/screw is removed.
IKEA's website actually says that the shelf can hold 18-44 lbs. Trust me, when done right (which, like all quality things is rarely 'quick and easy') the LACK shelf is great. The whole point of doing something yourself is the fact that YES it will take you more time than a professional who builds such things all the time - but it will also cost you many fewer actual $$.
I love IKEA! Even if I don't need to save money, I will buy most things for my home there. Their kitchens are so much more attractive and innovative than those from home improvement stores. I had a LACK shelf (76 inch long one) droop because I didn't use anything other than screws to mount it onto an old crumbling plaster wall. So I reinstalled it using anchors recommended by the local hardware store and so far it is okay with the IKEA storage boxes with metal corners.(Kassett) Next time I will do as recommended here and try to mount it on studs since I will want to store heavier things on my next set of Lack shelves.
I love my Lack shelf and am putting up another this weekend. The way I did it as described in previous posts is to A) locate your studs and then B) drill out new mounting holes in your Lack Shelf Bracket. If you desire to center the shelf based on something, the factory holes are usually useless. It is my opinion this mounting keeps the shelf the safest with the least amount of work.
I would never consider using anchors...but then again I'm mounting on drywall. Anchors might be better in brick or concrete but I'd still choose a self tapping bolt. Although better, I wouldn't use a toggle bolt because they are a pain to install. My issues with toggles:
A) You need a monster size hole to fit the toggle through
B) You need to line all them up and push through the wall.
C) If you spin the head down too far on the bolt, the toggle won't make it all the way through to 'spring' open behind the drywall. In this case you need to apply back pressure to loosen the bolt for more room to push through wall.
D) Watch you don't crank down on the toggle bolt because sometime is 'never feels tight enough' and then you compromise the back of the drywall and thus the installation is compromised.
To close...simply drilling a few holes in the bracket was the quickest and easiest for me for a safe installation.
I don't understand the problem. I am a 58 year old grandmother and I just installed two Lack shelves; red; with no hassle and all by myself. Yes, I already had a level and a power screw driver and a stud finder; those are basics. My only hassle was the fact that nothing wall mounted in IKEA is 16 inches on center. So I made sure I caught at least two studs and then used wall anchors for the rest. They look great and are right above my desk. They are secure enough to put books and photos on them!!
Does anyone know how to remove the backplate from the shelf itself? I didnt install them in the first place years ago and now it fell out of the wall and I want to remount. But the bracket is attached to the shelf....
Anyone help?
Dear Anonymous --
No idea when you left your comment so hopefully you've figured this out by now, but two very discreet screws anchor the wooden "shell" of the shelf to the metal bracket. They are on the underside of the shelf, are tiny, and at least on my black/brown shelves they blend in very well.
Um IKEA sells "Mooring screws" separately - which appear to be deforming type screws for holding heavy-ish objects in drywall board. Their plugs appear to be for concrete, and screws for wooden walls/studs.
For the mooring screws basically you drill a small hole (like for a toggle bolt) you stick the device through and when you tighten it, it pulls the ends together and 4 or so metal wings start to stick out in a circle to support the weight over a large area of the drywall.
Save yourself the headache and expense. Buy an old two-tiered coffee table, the ones that have a small shelf that sits atop the lower shelf that is supported with four legs. These can be purchased relatively cheap at a thrift store. Dismantle it. You will using the rectangular (2) pieces. Clean them up with a damp cloth. Cover the scratches with a dry erase marker and gently wipe over them with your damp cloth. Allow to dry. Using a dry cloth, wipe down with floor wax, be generous but use common sense. Allow to dry. Find the side that is most complimenting and hang it on your wall directly from underneath as there is the bottom which is open. Borrow a drill from "someone" and purchase your screws from your local hardware store. Purchase a level at the Dollar Store; it is only "a dollar." Put up your shelves. Cost is under $10.00 for everything.
Hmm - I'm in the UK - studs are at 400 or 600 centres (12" or 18" on old properties) and you can find them by tapping or just by drilling small holes behind where the shelf is going until you hit wood/metal. Solid walls require rawplugs (or matches!). A bit of gripfil won't go amiss either.
Splatgirl, I think I love you. Never in a dozen times putting up shelves and cursing to the heavens about screwed up Molly bolts and ruined drywall and five thousand pencil marks on my wall - never had it dawned on me to drill my own holes into the bracket. I am forever grateful.
And anonymous of the dismantled table...seriously?
The Lack sheld has long been a staple of IKEA. I seem to recall it was once made in in a rich brown (not blonde or or brown-black) and I'd love to be able to track down something similar again, in the long version. Any suggestions?
do you have pictures of the final project? love what you did. I almost bought some today but was afraid when he said anchor screws.
Use the Blogger search tool at the top and enter "shelf." It should come up in a December post.
Does anybody have advice on how to hang two Rationell Variera wine glass racks under the Lack shelf? I hear the shelf is hollow--how to screw in the wine glass racks and still keep them supported?
I'm in the U.S. and like most houses, mine has studs at 16" on center. Obviously that is a problem with the LACK Shelves since they're not even close to that. I'm using mine as a book shelf with around 40lbs of books on it right now.
I made my own screw holes in the metal at 16" apart using a 1/4" Cobalt Drill Bit. I've had my books on this shelf for more than a few weeks and no movement at all, it should support much more than the 40 lbs I've got on it now as well.
My dad put one up in my daughters room in perhaps a half hour or so while we lounged on her bed and watched. No muttering or swearing; it seemed to go well. He is great at projects like this, though, and he installed it so it is anchored well. Im not sure if he drilled new holes in the plate or not, but I dont think so because we just pulled the shelf off that plate to paint her room purple and I dont remember the plate looking anything but pristine. My father worked on aircraft and in hangars and on everything in our house for decades though, so maybe it takes someone who is basically a true handy-person to install one without incident. Not sure, but I count myself lucky...!
I just used some snazzy color-matched L-brackets. It may defeat the purpose of a floating shelf, but it can easily hold 200 lbs now.
Thanks a bunch. With a little bit of help from you, we were able to put 4 of these.
I love these shelves, and the first time I put them up, they went up with NO problem in a matter of hours (six of them) and I installed them by myself. I don't know how I did it, but I did. Now, I am trying to put them up again, this time in a new location, and though I'm not a drinker, yes, I will get the wine and maybe some other stuff to help me cope with the frustration of having a hundred holes in the wall where I'm putting the shelves up. I'mma call a handman or woman.
For some reason Ikea makes shelves 47 inches wide instead of 48...last time I chekced studs in the US are 16 inches on center...16....32....48 NOT 47. Very frustrating.
Wow this is awesome, thank you for the great and easy to follow instructions
I just put up my lack shelf and as soon as I put the self on the holder it started ripping out of the wall. I used screws, washers, and small anchors. What do I do now?
Instead of drilling new holes in the metal bracket, we installed a sanded/painted 2x4 on the wall--into the studs--and then screwed the Lack bracket to that. It frames the shelf on the wall nicely and is very secure.
I love the Lack shelves - we have a few of them around the house. The problem is that the holes are drilled to fit European stud spacing, and not North American. I understand this is also a problem with Ikea's kitchen cabinetry.
Electrician the woodlands tx
I haven't gone through all posts yet, but I wonder why IKEA just didn't produce brackets with more holes, spaced 1 to 1.5 cm apart? That's the first thing I noticed after purchasing these LACK shelves (and I am a girl!) :-) it would save us all so much hassle!
We are in the middle of trying to install them as I type this. In fact I found this site because I was trying to look up if we just got a bad bunch or if the product didn't come with the necessary hardware! Of course IKEA website was absolutely no help in trying to find this info. My husband is in the garage desperately trying to find something that will securely mount it. He has to leave for work in two hours and it needs to be done by tomorrow. We are totally not meeting the deadline. (We have company coming in and the house is a disaster because everything is cleared for the shelving instillation. Thus the deadline.)
If you prefer another color or wood finish, you can veneer a Lack shelf. This will require:
Wood veneer
Contact cement (use in a ventilated space)
Fresh razor knife
Veneer edging tool (or small router if you already have one)
Practice on something else first
Just veneer over the stock front, bottom and sides.
The "honeycomb" structure inside the shelf is well-engineered and the mounting bracket can be re-drilled with bits designed for the metal, as noted, so LACK saves many hours of time versus building a floating shelf yourself.
i just wanted to thank you so much for all of the expert advice you posted here! i've been taking tons of notes!! you made this easier to understand and I truly appreciate it!
your Cobalt drill bit advice is much appreciated!! i have several Dewalt drill bit sets and have found the ones labeled as "gold" to be terrible! i will follow your recommendation!
i'm out here with you in Earthquake prone Southern California - thus your comment helps me feel better tackling this shelf install!
Post a Comment